
User and Contributor Manual
Mindat Media Viewer
3D: "3D settings" menu
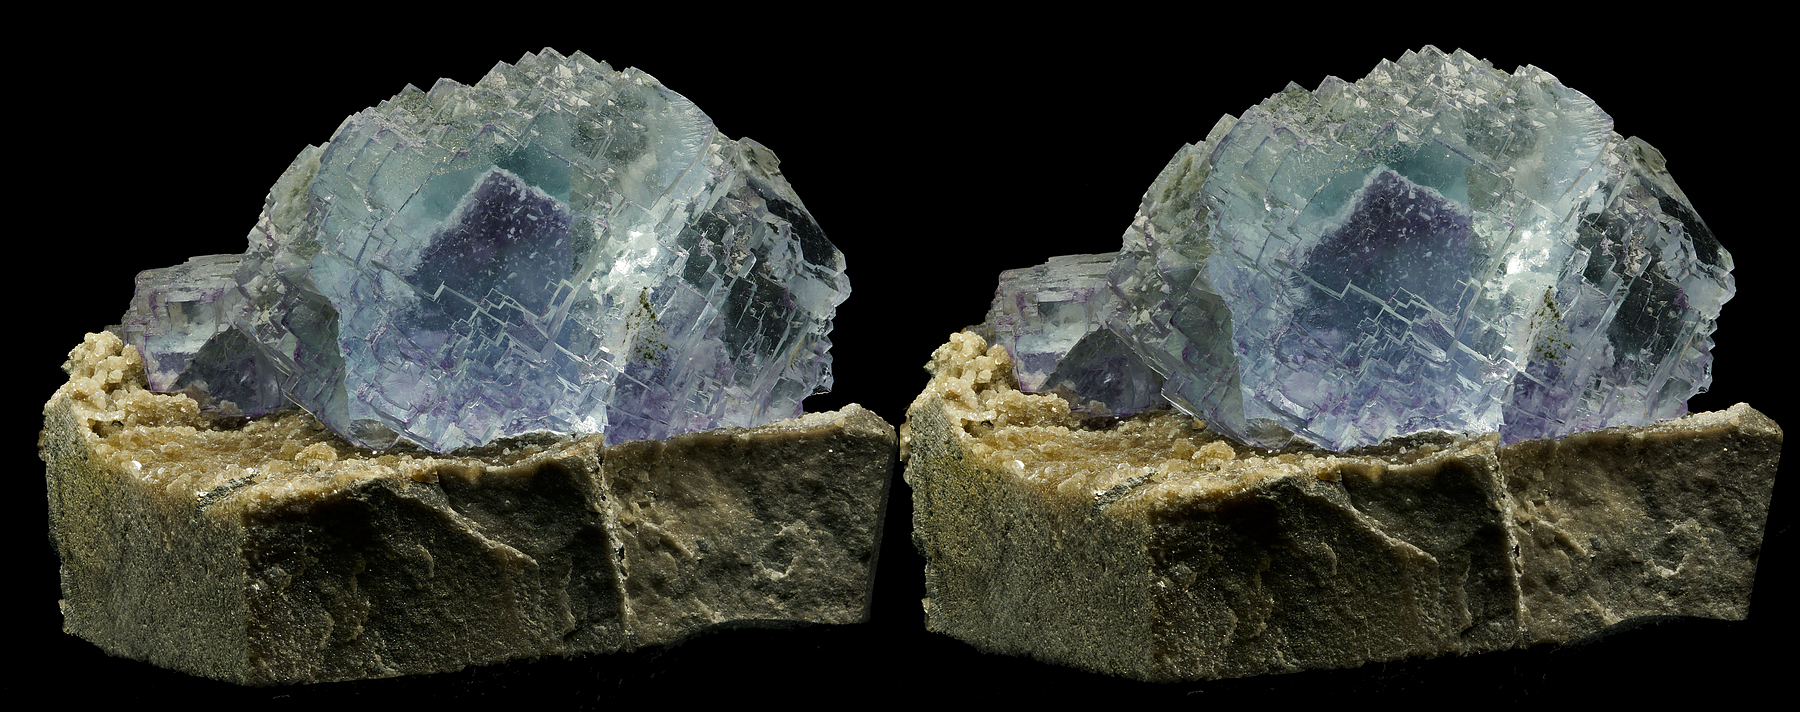
Mindat photo viewer allows to view 3D content - photos in horizontal stereopair format. If a stereopair photo gets open in the viewer, 3D button will appear in the bottom right corner, giving access to "3D settings" menu.
3D Setting menu
The 4 key can be used instead of this button.
Toggle fullscreen is very useful on mobile, allowing to win more screen space for the image itself.
Unfortunately this option is not supported on mobile Apple (iOS) devices.
Dim interface buttons. Buttons can be turned very dim, not to interfere with the photo. Note that the buttons become almost invisible, but still remain in their places and are clickable. You can also use space key to dim/show buttons.
The 3 key can be used to switch between 2D and 3D. It switches to the viewing mode that was used last (side-by-side, anaglyph, interlaced). If no prior settings were made then by default side-by-side cross-eyed mode is chosen.
3D: Viewing modes.
1) Side-by-side mode
Requirements:
- skill to view stereoimages without any special glasses
OR
- stereoscope glasses.
The images can be viewed without any glasses if you mastered cross-eyed or parallel-eyed method.
"Switch left and right images" button will switch the view from crossed-eye to parallel and vice versa.
The skill can be trained usually in 5 min to 30 min, and after successful training it stays with you forever, taking just seconds to enter the "3D mode". On how to train to use cross-eyed method, refer to this article: Minerals in 3D: learning to use crossed-eye method
Another option is to use stereoscope glasses. Note, that stereoscope is not a microscope, but special glasses having simple construction with mirrors.

Examples of modern stereoscopes
For comfortable viewing in side-by side mode on wide screens the images shouldn't be too far away from the line of sight of each eye. Take a note that on the sides of the screen 2 dragbars are placed that can be dragged to bring the photos closer to the center. Choose comfortable width for you to work with and it will stay the same when opening other 3D photos. Double click the dragbars if you want to return them to their initial position.

Dragbars in side-by-side mode
2) Interlaced mode.
Requirements:
suitable Passive-3D television or monitor correctly configured for your computer.
3 types of picture output are supported:
Row-interlaced, Column-interlaced, Chessboard (also known as checkerboard, DLP TV).
Stereoscopic 3D image viewing requires a suitable 3D television or monitor correctly configured for your computer. Passive 3D systems such as LG 3DTVs are the easiest to configure for this.
3) Anaglyph mode.
Requirements:
anaglyph glasses. The most popular glasses type is Red-Cyan.

Anaglyph glasses
Anaglyph mode allows to view 3D using very cheap glasses but it poorly represents color, loosing almost all of it. There are several anaglyph modes to experiment with. Default one, "Optimized +" works the best in most cases, but for some of the images other modes may give better results. To view anaglyph your monitor colors have better to be set to match your glasses colors (e.g. pure red colored part of the picture on monitor should disappear when viewed through the red filter). If the monitor is displaying colors differently, artifacts may be seen in 3d.
Currently red-cyan and green-magenta filters are supported. Support for yellow-blue glasses may be added if anyone will need it.
3D: Creating stereopairs and uploading them to Mindat
How to shoot stereopairs. There are two most popular methods:1) To make two shots of the specimen on a rotation stage, rotating the specimen between the shots. The angle of rotation has to be chosen experimentally, depending on desired scene depth, but usually it is 3-7 degrees. Another way is to move the camera accordingly instead of rotating the specimen.
2) When shooting macro with stacking, stereopair can be generated from a single stack with the help of stacking software. E.g. Zerene Stacker has built-in instruments to do it.
Please refer to Tony Peterson's article: On generating stereo images with focus stacking software
Uploading stereopairs to Mindat.
To upload your photo as a stereopair select "Stereopair" in the field "View mode"
and choose the format of uploaded file (LEFT | RIGHT) or (RIGHT | LEFT).
Before uploading a stereopair you should check that it is aligned vertically and horizontally, so that the images overlap. Vertical alignment is especially important. We recommend to use the "Auto-align" function of StereoPhotoMaker software. Auto-alignment in 99% of the cases works better than manual. If the photo is low quality or unaligned the moderators may ask to reload a better version.
Former "Stereo view" photo type is deprecated. Instead a new field "View mode" is added, that can take value "Stereopair". If you edit a photo that had photo type "Stereo view" before, you will have to choose a different type before saving it.
All stereopairs that had photo type "Stereo view" have been converted to the new format automatically.
If you have older stereopair images on mindat that haven't been converted:
If you have a lot of images to convert - the best option is to ask Pavel Martynov (in mindat private message) to convert them automatically, and provide the following:
1) format of your photos: "RIGHT | LEFT" or "LEFT | RIGHT",
2) any rule how to find them, e.g. "Convert all my photos that contain '3D' in description",
OR
provide a set of photos' ID numbers in any uniform format, e.g. " 1025382 1025388 1025999 ... ... "
Also you can always convert your photos manually one by one by editing the photo and setting "View mode" parameter to "Stereopair" and then saving the photo.
3D: search for photos
In photo galleries and search results stereopairs are marked with 3D glases icon
 . You can filter search results with 3D images only by choosing "Show -> Stereo images -> Filter search".
How to filter stereo images in photo search
3D images can also be found using "Mindat -> Photo -> Photo search" menu entry.
The following keywords is the search string will turn on the filter: 3d, stereo, stereopair.
For example, "3d newest" will return all the photos of the type "stereopair" starting with the most recent:

Searching for the 3D images in photo search
3D: How to insert stereopairs into articles
Mindat Markup Language is used for formatting articles. For stereopairs, an addditional attrribute to the <pic> tag is introduced. By default the image for the right eye is displayed as a smaller sized preview in an article. This can be changed to showing image for the left eye, or RIGHT|LEFT view, or LEFT|RIGHT view. This can be done with the help of new attribute "stereo" for the <pic> tag.Examples:
1)
<pic id=1106350 stereo=RL width=900>Right|Left (Cross-eyed)</pic>
Right|Left (Cross-eyed)
2) LRL and RLR layouts are not supported in "stereo" parameter, but you can easily create them using <PBOX>:
<PBOX width=2><PIC id=657951 float=left stereo=L>Left image</PIC><PIC id=657951 float=left>Right image</PIC><PIC id=657951 float=left stereo=L>Left image</PIC></PBOX>


Navigation buttons (previous/next photo)
There are two sets of navigation buttons.The arrow buttons at the bottom of the page are responsible for switching between the photos of the same specimen (child photos).
The arrow buttons on the left and on the right side navigate between the photos in a gallery or in an article or in search results. They switch between the photos from the page that was opened last.

Navigation between the photos
The scalebar
The scalebar is placed in the left bottom corner of the page. The scalebar is shown when FOV is filled for the photo (FOV = Field of View = horizontal width). The ruler can be dragged and resized. To resize drag it's rightmost edge. Double click resets it to default state.
The scalebar
Comparison mode
Comparison mode is now available in the Mindat media viewer. It can be used for, e.g.:- showing fluorescence of the specimen (visible light, UV, etc.)
- showing inclusion or gemmological specimen in different lighting (reflected light, brightfield, darkfield, polarized light - polarizers crossed).
- compare the specimen with the drawing or scheme.
- compare the two photos when illustrating photogaphy or photo processing technique.
In galleries and search results the photos with comparison mode enabled are marked with
 . To filter the search results with 'comparable' photos choose "Show -> Comparison sets -> Filter search" in the filters area.
How to find 'comparable' photos
Photos with comparison mode enabled can also be found using Mindat photo search: "Mindat -> Photo -> Photo search".
The keyword compare in the search string will filter 'comparable' photos only.
For example: "compare newest" will find all 'comparable, and will show them beginning with the most recent ones.
When photo with comparison mode enabled is opened in the viewer, a button
 , appears in the right bottom corner of the page, giving access to "Settings" menu.
Comparison mode example - one and the same specimen in 6 types of lighting. Open the original photo in comparison mode
comparison mode has two layout types:
1) Images are displayed next to each other and their zoom and navigation are synchronized. The screen can be split into 2 to 6 sections, each of them will display one of the photos compared (see the photo above).
2) Two images are displayed with a slider for switching between them (see the photo below).
In all layouts each photo has its own view selector. That allows to choose the desired view when the number of views in the comparison set is greater than the number of sections on the screen. The number of views in comparison set is not limited.
☑ Hide view selectors This checkbox hides view selectors.

Slider layout. Open the original photo in comparison mode
Here is another example of how the comparison mode can be used.

Comparison with the drawing. Open the original photo in comparison mode
Comparison mode: uploading sets to Mindat
To enable comparison mode for specific photos, on loading or editing the photo choose "Comparison" in the field "View mode" and fill the "Main photo ID in comparison set" field with ID of the Main photo in the set. All photos having the same Main photo ID are included in one comparison set. The field "Name of current photo as view in comparison set" has to be populated with short name of the current view in the set, name that characterisez the photo best and shows it difference from the other views of the set.Examples:
|
360°spin images / animations
In photo galleries and search results 360°spin images are marked with the Spin icon .
. You can filter search results with 360°spin images by choosing "Show -> 360°spin images -> Filter search".
360°spin images can also be found using "Mindat -> Photo -> Photo search" menu entry.
The following keyword in the search string will turn on the filter: spin.
For example, "spin newest" will return all the photos of the type "360°spin" starting with the most recent.
To upload a spin-sequence of photos pack the photos in a single zip-file and upload via photo upload interface. Note that the maximum dimensions supported (width and height in pixels) for spin photos is 2048 * 2048. If uploaded images are larger, they will be downscaled.
Spin animations work best if they have at least 25 frames - the recommemded amount is 40 frames or more. Put all the frames for your animation into a zip file, and upload the zip file to mindat just as you would for a photo. Mindat.org handles the rest for you.
Controls - Animation (Spin Rotation)
Animation (usually 360 degree spin rotations) have their own controls:
- enable spin mode. Note that while images are loading this option will not be available but will be automatically activated when the animation has loaded. Once active you can spin the image/change the animation by moving your mouse or finger on the image left/right or by pressing the [ or ] keys.The
 button switches to move mode so that you can use your mouse/fingers to move the image around the screen as with other media types.
The
 button, or the P key will start playing the animation directly, you can interrupt this by using the mouse or finger on the image to regain manual movement control.
For detailed info on how to create 360°spin animations, please refer to:
360 degree Spin Mineral Photography


Quick Nav3D: "3D settings" menu3D: Viewing modes.3D: Creating stereopairs and uploading them to Mindat3D: search for photos3D: How to insert stereopairs into articlesNavigation buttons (previous/next photo)The scalebarComparison modeComparison mode: uploading sets to Mindat360°spin images / animations


